Leaders and Enders!
(Click Here for Printer-Friendly Version)

Adventures in Chain Piecing :c)

Adventures With Leaders & Enders is was released in Feb 2010! It's chock full of fun scrap quilts that you can stitch in between the lines of sewing other projects!
Click HERE to order!
If you wish to SEND a check instead of an electronic payment, you will find a printable order form HERE!
Below is a preview of what leaders & enders are and how I work with them, and you can see a few of the book projects in stages.
The book contains 12 large project quilts, and lots of information on working with scraps that you won't want to miss!
(Click Here for Printer-Friendly Version)
Adventures in Chain Piecing :c)
Adventures With Leaders & Enders is was released in Feb 2010! It's chock full of fun scrap quilts that you can stitch in between the lines of sewing other projects!
Click HERE to order!
If you wish to SEND a check instead of an electronic payment, you will find a printable order form HERE!
Below is a preview of what leaders & enders are and how I work with them, and you can see a few of the book projects in stages.
The book contains 12 large project quilts, and lots of information on working with scraps that you won't want to miss!
I learned a long time ago to use a folded scrap to sew on and off of at the beginning/ending of a line of chain piecing...you would get to the end of your chaining, and sew onto this scrap, leaving it under the needle of the machine, and snip the threads between it and your piecing behind the presser foot. This always leaves SOMETHING under the foot so you dont start the next line of piecing with long threads that get tangled and get sucked down the needle hole pulling your fabric pieces with it, or worse, have to trim all those, trying to get them in the trash, but finding them ending up more on the floor, and clogging the wheels of your wheelie chair at your sewing machine as you roll over them or around the vacuum beater bar!
When you get to the end of the next chain of piecing, you put another fabric scrap though the machine and trim behind it...then you would go up to the top of the piecing you just trimmed off, removing the fabric scrap (sometimes called a 'thread bunny' by those who use this method) and have it ready for ending the next line of piecing.) I typically had two thread bunnies going at any given time, one would be under the foot as the 'leader' to start the piecing with, the next one would be the 'ender' as I ended. The 'ender' becomes the new 'leader' as you start the next line of piecing.
I would continue to use the same scraps to sew on and off of until they were clogged with thread, then that would STILL end up in the trash...and I would start with new ones until they were too full of thread to use anymore.
Then a lightbulb went off. I took a bin of scrap 2" squares that had been accumulating from trimming scraps down, and started using those as leaders/enders instead of a wadded up thread covered scrap. I would sew a light square to a dark square, trim off behind it.....and eventually have a stack of these little "two squares" that I would also use as leader/enders to sew into 4 patches....
The first pic shows trimming the other chain piecing I was working on BEHIND the two leader/ender squares that I just fed through the machine..I am using little spring thread snips that I keep at my machine for reaching behind and snipping. It's easier than trying to get back there with big 8" sewing scissors. The second pic shows two pairs of 'leader/enders' being sewn into a 4 patch at the ending of a line of chain piecing:


The 4 patches finished at 3", and I paired them up with 3" finished 1/2 square triangles making
this block unit:

I made THIS quilt with them:

Finished and bound!
Click here to see Wendy's Layout of the same block!
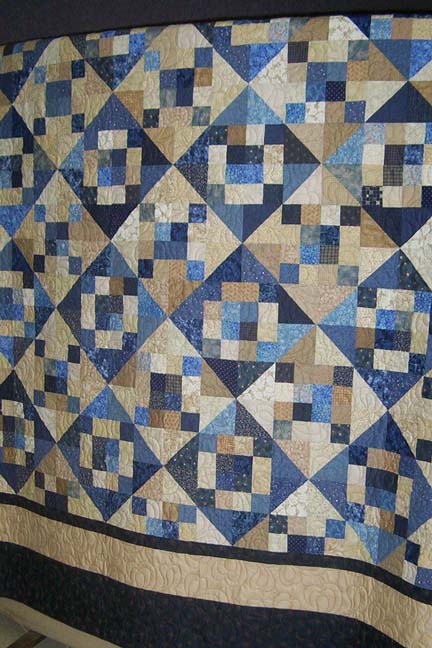
I was so enthralled with how this quilt grew while I was working on OTHER projects at the same time that I quickly had to come up with another! So I started sewing 9 patches the same way, using red and neutral squares as leaders/enders. I ended up with THIS quilt:

My third leader/ender project went quickly too..I made a scrappy double irish chain with the leader/enders... It's shown here as one block, and as the blocks are being laid out. The blocks are made with 4 four patches from light/dark scraps (the 4 corners of the block), and 4 connectors
that are made with a dark scrap sewn to a 2" square of the background that is the same fabric as the alternate blocks (the background fabric square is at the center of the 4 sides) and one plain center square for the center of the block. I do the alternate blocks as leaders/enders too...the
2"X 5"rectangles for the sides of the block have 2"scrap squares sewn onto the ends of them before they are sewn to the large 5"X 8"alternate rectangle..all while sewing other projects, and using these just to start and end a line of piecing.

Here are a few of the blocks as they were coming together:

And the full quilt! There are 66 checkerboard blocks and 66 alternate blocks
for a total of 132 blocks set 11X12!

Finished and bound!
Click here for a close up of quilting detail.
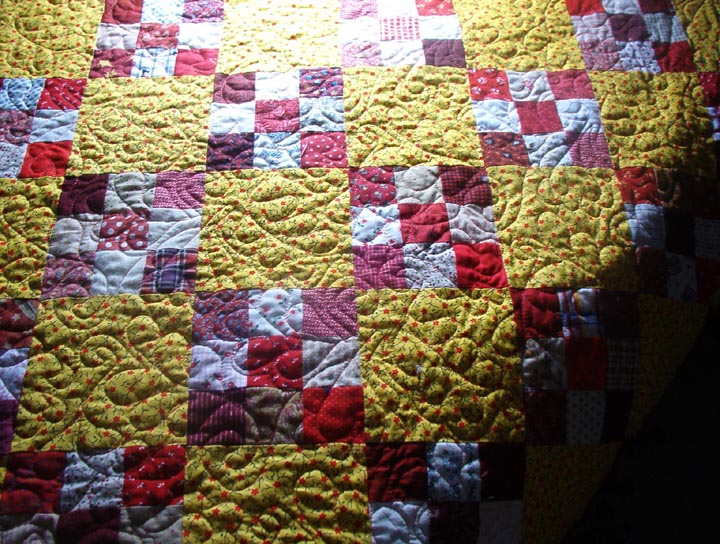
My fourth leader/ender project was a zig-zag 9 patch. I made the 9 patches from leader/enders with more scrap 2" squares. These 9 patches are completely random, each 9 patch has 9 different fabrics in it. This really wasn't a chain piecing project...I suppose it could be if I wanted to sew 3
panels of 3 strips each, sub cut them, rearrange, sew back together...but that isn't the point. This project, a pair of 2" squares at a time, then a third added, then 3 rows of 3 sewn together as leader/enders while I work on other things.....grew all on it's OWN!
When I have 10 completed 9 patches, I pin them together with a safety pin. Easier for me to count that way..just count the pins...
Time to start putting this leader/ender project TOGETHER!
Here is the center together before borders!

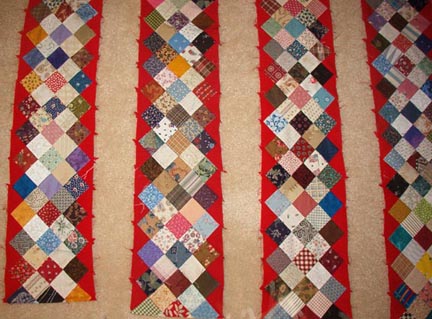
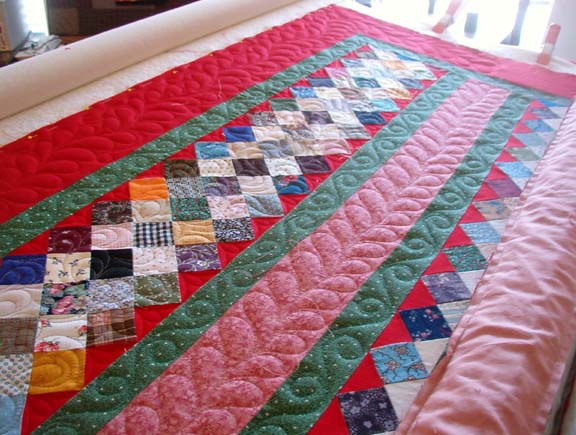
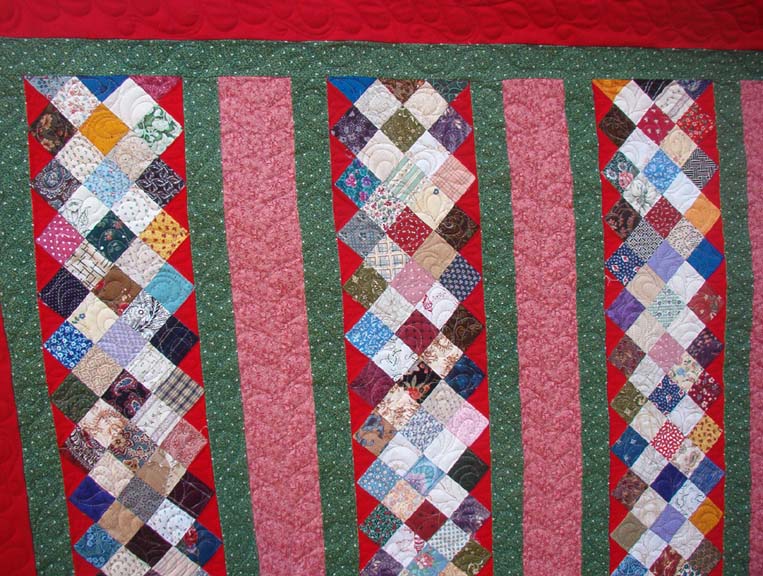
I quickly had to come up with what to do NOW in the leader/ender department since the 9 patches were all done....I still have an overflowing bin of 2" scrap squares sitting by the machine. I remembered an antique strippy quilt I had seen....and the light bulb was firing off again. This is
what I have going, just since counting the 9 patches, seeing I had enough, and switching gears into the next leader ender project.
These strippy panels may go with alternating plain panels that I can do some fancy quilting in, or maybe I will use them as the 'bars' between some other piecing, like stars on point....something will come to me! What I am doing is piccing dark/light/dark/light/dark (5 squares) into a chain, and then piecing two solid red triangles onto the end of each row. This will put the pieced bar on the diagonal....all steps can be done as leader/enders, even adding the next finished 5 square bar with two triangles unto the strippy unit that will grow quickly on it's own as I work on other things! I need 7 panels to finish the quilt, and look....I'm nearly done with the 7th one! Time to think about what leader/ender project I want to do next :c)
And they dont even HAVE to be scrappy. They can be planned. Think of the next project you WANT to do even though you are already piecing on something else. Are there units in that 'next' quilt that you can cut pieces for, and use those for leaders/enders as you work on your current project? You can have that 'next quilt' nearly half pieced by the time you finish your current top! And that is the exciting part. You just have to think ahead and have something cut and sitting at the side of your machine for you to use and you will be amazed how fast units stack up :c)
With borders!

I quickly had to come up with what to do NOW in the leader/ender department since the 9 patches were all done....I still have an overflowing bin of 2" scrap squares sitting by the machine. I remembered an antique strippy quilt I had seen....and the light bulb was firing off again. This is
what I have going, just since counting the 9 patches, seeing I had enough, and switching gears into the next leader ender project.
Close up pic of leader/ender strippy panels

This is the finished quilt! The binding is on, but still has to be turned to the back and handstitched down!
Close up of quilting while on machine and on fence!
So, now that you know what leaders/enders are....can you see yourself doing something with them?The pieces don't have to be 2" squares..they can be ANY size...they can be rectangles for a rail fence, they can be 1/2 square triangles...just ANYTHING that you can use to start and end a line of piecing.This is the finished quilt! The binding is on, but still has to be turned to the back and handstitched down!
Close up of quilting while on machine and on fence!
And they dont even HAVE to be scrappy. They can be planned. Think of the next project you WANT to do even though you are already piecing on something else. Are there units in that 'next' quilt that you can cut pieces for, and use those for leaders/enders as you work on your current project? You can have that 'next quilt' nearly half pieced by the time you finish your current top! And that is the exciting part. You just have to think ahead and have something cut and sitting at the side of your machine for you to use and you will be amazed how fast units stack up :c)
Any other questions on why I do this? :c)

Absolutely amazing !! Your leaders and enders is a complte revelation to me as a new quilter who has only just started 3 months ago. Your site was recommended to me by my P & Q teacher this afternoon and I can't wait to start!!
ReplyDeleteBest wishes
Jane
jg.carter@ntlworld.com England
Absolutely amazing !! Your leaders and enders is a complte revelation to me as a new quilter who has only just started 3 months ago. Your site was recommended to me by my P & Q teacher this afternoon and I can't wait to start!!
ReplyDeleteBest wishes
Jane
jg.carter@ntlworld.com England
I need to get cutting some 2" squares from my scrap bag. I have recommended your site to so many people. I love the fact that you are an economical quilter and promote recycling and using what you have. Regards Jan Ward from england
ReplyDeleteWhat a great idea. Thank you.
ReplyDeleteJust went through my stash and was amazed by all the squares I found in different sizes, but A LOT of 2"...
ReplyDeleteWith this technique it's simpel to use them. Thank you so much for the tip.
BTW I read your site as a quilting bible, hihi! So much useful info!
Warm regards from Trudy from The Netherlands
What a great tip! Thank you! Very helpful!
ReplyDeleteTrudy from The Netherlands.
Good grief! Making a quilt out of the little bits that you use to save yourself from having long trailing threads when you're piecing a quilt! I think I'd confuse myself if I tried it, but well done, that first quilt looks stunning.
ReplyDeletelove your blog,
ClaireBear
I have thought about doing a leader and ender quilt for a long time now and just never get around to doing one, lately though my sewing machine keeps coming unthreaded for some reason when I finish a line so I thought it might be a good time to always have something under the presser foot! I will get started possibly tomorrow when I look through the scraps.
ReplyDeleteNever heard of leaders & Enders before, always like to learn something new. Thank you
ReplyDeleteStarted this quilt . I'm making my 4 patches with 2 1/2 inch squares because I have so many that size, my HST will be made either with 7 " squares and sewing together 1/4 all around and then cut diagonally or with 3 1/2 " strips using a triangle ruler. Will share photo's in a email to Bonnie. I so hope this works out , I have never done this before but my first finished block looks great.
ReplyDeleteIt's quilt multitasking! Great idea!
ReplyDeleteI love this idea for using leaders and Enders. I decided to try this while working on my current quilt. I found your Fourth of July pattern and decided to use it for a Quilt of Valor. I have the fabric and plan to get it going. I am just getting back into quilting again so I don't have a stash, yet. Thanks for sharing this technique.
ReplyDeleteSharon
Thank you so much for letting us see the close ups of the quilting!!! It helps so much to study what other quilters do and get braver with my own quilting!
ReplyDeleteLove the Zig Zag nine patch!!!!!
ReplyDeleteWill have to put that on my list.
Thanks for sharing.
This is such a great idea. Especially if you just feel like sewing but don't want to fuss with an intricate pattern. Just be blissfully running the machine, but don't got too tranquil or you just may have a mile long chain.
ReplyDeleteIn my small quilt group, years ago, one of the gals was sewing her rows of blocks together. She had used 2 1/2" squares as the leaders/enders. When she held it up all the sewn squares were hanging off the edges, this MUST have been in 2001, she proclaimed "hanging chads!" We have called anything with a 2 1/2" 4-patch a hanging chad ever since!
ReplyDeleteWhat a great idea! I am blown away by your creative mind and ingenuity. Thank you so much for sharing!
ReplyDeleteI don't understand this concept...I thought that if you start sewing with a leader you start past the edge so it doesn't get clogged up? Why do the leaders and enders you plan to use in a quilt not clog up if you don't have a folded leader first?
ReplyDeleteThanks for the recap. I have this book but was still a little confused on the process. Well after reading this the "light bulb" finally came on LOL. Thanks again I just Love my book.
ReplyDeleteThanks for the recap. I have this book and I just love the patterns, Texas braid is my favorite. I read the process of the leaders/enders but it did not stick. But after reading this the "light" finally came on, LoL. This will come in very handy as I am a scrap hoarder. Thanks again
ReplyDelete